Canning Pumpkin: How to make home-canned pumpkin! In easy, illustrated steps!
 Canning Pumpkin: How to Make Home Canned Pumpkin!
(and winter squash, like butternut)
Click here for a PDF print version
You probably take canned pumpkin for granted. You're there, the can is there, there's a pumpkin on the label... open it and mix it up with spices to make a pie, right. Ah, but a pumpkin pie, pumpkin soup, pumpkin bread made from a fresh pumpkin tastes so much better than the glop that was processed last year! Canning pumpkin at home is easy! Here's how to do it, complete instructions in easy steps and completely illustrated. And it is much easier than you think, using my "patented" tips and tricks! You can freeze it for later use, too. One important fact: you can the pumpkin as cooked cubes, not a puree nor a ready pie filling. And you must use a pressure canner, not a water bath canner. See this page for the safety reasons why.Directions for Home Canning Pumpkin from Scratch
Ingredients and Equipment
- a pie pumpkin, or other hard winter squash, like butternut, jarrahdale, neck, hubbard, turban, etc. (see step 1)
- A sharp, large serrated knife
- an ice cream scoop
- a large microwaveable bowl or large pot
- Pressure canner
- Canning jars with rings and new lids
Recipe and Directions
Step 1 - Get your pie pumpkin
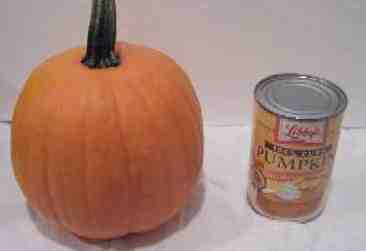 "Pie pumpkins" are smaller, sweeter, less
grainy textured pumpkins than the usual jack-o-lantern types.
grocery stores usually carry them in late September through December in
the U.S. Note: the Libby's can of cooked pumpkin is just there
for reference - it is the small can, so that gives you an idea of the size
of a typical pie pumpkin. They're only about 8 inches in diameter.
"Pie pumpkins" are smaller, sweeter, less
grainy textured pumpkins than the usual jack-o-lantern types.
grocery stores usually carry them in late September through December in
the U.S. Note: the Libby's can of cooked pumpkin is just there
for reference - it is the small can, so that gives you an idea of the size
of a typical pie pumpkin. They're only about 8 inches in diameter.
Just like selecting any squash, look for one that is firm, no bruises or soft spots, and a good orange color. Pumpkins and squash should have a hard rind and stringless, mature pulp of ideal quality for cooking fresh. You can also use these directions for any hard winter squash, such as butternut, hubbard, turban, etc.
Yield: Pie pumpkins are small, usually only 6 inches in diameter. You can usually obtain about 2 or 3 cups or puree per pumpkin. An average of 16 pounds of raw pumpkin is needed per canner load of 7 quarts. Or an average of 10 pounds per canner load of 9 pint jars. This works out to an average of 21/4 pounds per quart.
Step 2 - Prepare the pumpkin for cooking
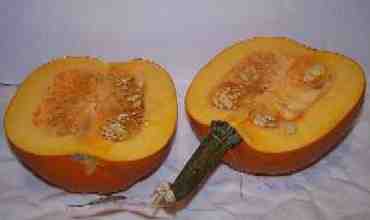 Wash the exterior of the pumpkin in cool or
warm water, no soap.
Wash the exterior of the pumpkin in cool or
warm water, no soap.
Cut the pumpkin in half. A serrated knife and a sawing motion works best - a smooth knife is more likely to slip and hurt you!
Step 3 - Scoop out the seeds...
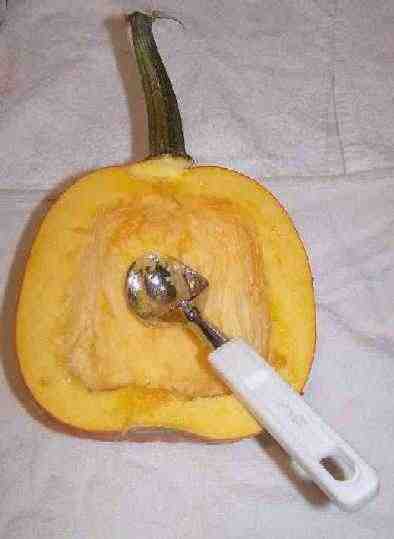 And scrape the insides. You want to
get out that stringy, dangly stuff that coats the inside surface. I
find a heavy ice cream scoop works great for this.
And scrape the insides. You want to
get out that stringy, dangly stuff that coats the inside surface. I
find a heavy ice cream scoop works great for this.
Note: SAVE THE SEEDS:
The seeds can be used either to plant pumpkins next year, or roasted to eat this year! Place them in a bowl of water and rub them between your hands. then pick out the orange buts (throw that away) and drain off the water. Spread them out on a clean towel or paper towel to dry and they're ready to save for next year's planting or roast. Click here for roasting instructions! (opens in a new window)
Step 4 - Cooking the pumpkin
There are several ways to cook the pumpkin; just choose use your preferred method. Most people have microwaves, and the use the least energy, so I'll describe that here. But others make good arguments in favor of using a pressure cooker, steaming on the stovetop or baking in the oven. I'll describe microwaving here, and at the end of this document, I've included alternative instructions to replace step 4, if you'd rather use a different method.Put it in a microwaveable bowl
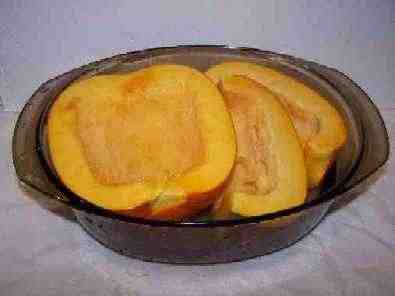 Remove the stem, and put the pumpkin into a
microwaveable. You may need to cut the pumpkin further to make it fit.
The fewer the number of pieces, the easier it will to scoop out the cooked
pumpkin afterwards.
Remove the stem, and put the pumpkin into a
microwaveable. You may need to cut the pumpkin further to make it fit.
The fewer the number of pieces, the easier it will to scoop out the cooked
pumpkin afterwards.
Put a couple of inches of water in the bowl, cover it, and put in the microwave.
Step 5 - Cook the pumpkin until it just starts to get soft
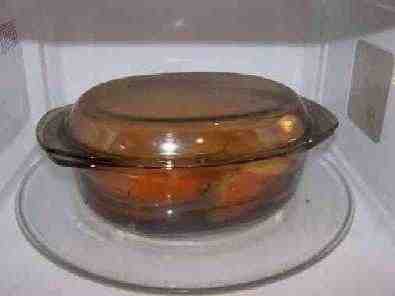 Cook for 10 minutes on high, check to see if
it is soft, then repeat in smaller increments of time until it is soft
enough to separate (peel by hand) the skin easily, but the pumpkin is not
yet mushy.. Normally it takes 20 or 30 minutes
in total. Caution: Do not mash or puree.
Cook for 10 minutes on high, check to see if
it is soft, then repeat in smaller increments of time until it is soft
enough to separate (peel by hand) the skin easily, but the pumpkin is not
yet mushy.. Normally it takes 20 or 30 minutes
in total. Caution: Do not mash or puree.
Or steam on the stovetop
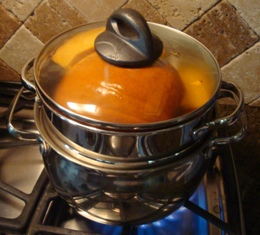
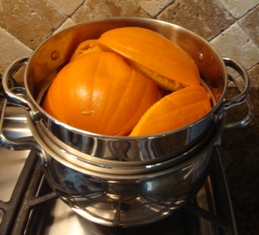
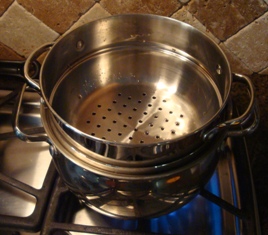
You can also cook it on the stovetop; it takes about the same length of time in a steamer (20 to 30 minutes). I use a double pot steamer, but you could use an ordinary large pot with a steamer basket inside it!: Save the cooking liquid to fill the jars - otherwise you will need to get another pot of water boiling to replace the lost liquid.
Step 6 - Peel
You should be able to easily peel off the skin using a blunt knife in one hand and an oven mitt (I like the waterproof silicone type) in the other.
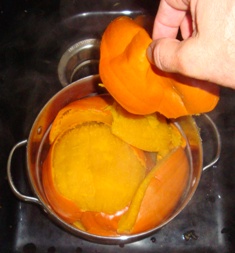 Many
times the skin or rind will simply lift off with your fingers (see the
photo at left) . I'll bet you didn't realize making your own
pumpkin glop... err, "puree" was this easy!
Many
times the skin or rind will simply lift off with your fingers (see the
photo at left) . I'll bet you didn't realize making your own
pumpkin glop... err, "puree" was this easy!
Step 7 - Cut into 1 inch cubes
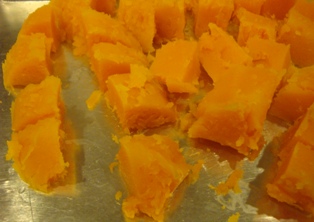 Now, cut the flesh into 1-inch cubes. Do NOT mash it!
Note: there are many varieties of pumpkin and some make better pies that other (due to sugar content, flavor, texture and water content. Drier, sweeter, fine-grained pies; the small (8" across) ones called "pie pumpkins" are best. If your pumpkin is much more watery than the puree in the photo at right (there should not be any free water), you may want to let it sit for 30 minutes and then pour off any free water. That will help prevent you pie from being too watery! Beyond, that, I have not found that the water makes a difference - I wouldn't be TOO concerned about it!
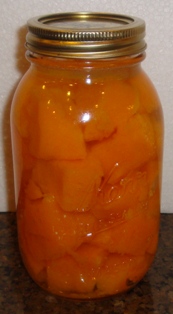
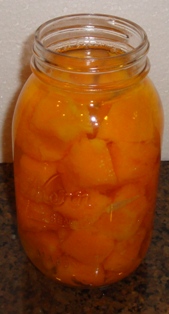
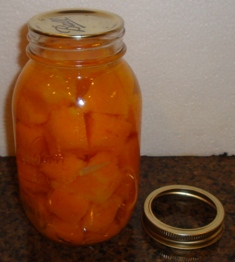
Step 7 - Pack the jars
 Fill jars with cubes and cooking liquid, leaving 1-inch
headspace. Fill up to 1 inch from the top with the hot cooking liquid that you
saved in step5. If you threw it out, add boiling water. Adjust the rings
and lids.
Fill jars with cubes and cooking liquid, leaving 1-inch
headspace. Fill up to 1 inch from the top with the hot cooking liquid that you
saved in step5. If you threw it out, add boiling water. Adjust the rings
and lids.
Step 8 - Put the jars in the canner and the lid on the canner (but still vented)
Using the jar tongs, put the jars on the rack in the canner. By
now the water level has probably boiled down to 3 inches. If it is
lower than that, add more hot tap water to the canner. When all the jars
that the canner will hold are in, put on the lid and twist it into
place, but leave the weight off (or valve open, if you have that type of
pressure canner).
 And
, yes, you MUST use a pressure canner!!!
And
, yes, you MUST use a pressure canner!!!
Step 9 - Let the canner vent steam for 10 minutes
Put the heat on high and let the steam escape through the vent for 10 minutes to purge the airspace inside the canner.
 Step 10 - Put the weight on and let the pressure build
After 10 minutes of venting, put the weight on and close any openings to allow the pressure to build to 11 to 13 pounds in a dial-type gauge canner - shown in the photos (or at 10 to 15 pounds pressure in a weighted gauge canner.
Step 11 - Process for the required time
Once the gauge hits 11 pounds (or 10 pounds in a weighted gauge type), start your timer going - for 65 minutes for pint jars and quarts for 75 minutes. Adjust the heat, as needed, to maintain 10 pounds of pressure. Remember - this is an estimated time based on cubed squash - I still recommend you put the finished jars in the refrigerator afterwards.
Pressure required depends on the altitude where canning is being done. Note: the chart below will help you determine the right processing time and pressure, if you are above sea level.
It is important to learn how to operate your pressure canner by reading the owner's manual that came with your particular canner. If you can not find your owner's manual, you can obtain find one online: Here is where to find some common manufacturer's manuals:
or by contacting the company that made your canner. Give the model number to the manufacturer, and they will send you the right manual. More notes on pressure canners from Colorado State University.
| Table 1. Recommended process time for Pumpkin and Winter Squash in a dial-gauge pressure canner. | ||||||
| Canner Pressure (PSI) at Altitudes of | ||||||
| Style of Pack | Jar Size | Process Time | 0 - 2,000 ft | 2,001 - 4,000 ft | 4,001 - 6,000 ft | 6,001 - 8,000 ft |
| Hot | Pints | 55 min | 11 lb | 12 lb | 13 lb | 14 lb |
| Quarts | 90 | 11 | 12 | 13 | 14 | |
| Table 2. Recommended process time for Pumpkin and Winter Squash in a weighted-gauge pressure canner. | ||||
| Canner Pressure (PSI) at Altitudes of | ||||
| Style of Pack | Jar Size | Process Time | 0 - 1,000 ft | Above 1,000 ft |
| Hot | Pints | 55 min | 10 lb | 15 lb |
| Quarts | 90 | 10 | 15 | |

Step 12 - Turn off the heat and let it cool down
After 55 minutes for pints, 90 minutes for quart jars, turn off the heat and let the canner
cool down. After the pressure drops to zero (usually, you can tell but
the "click" sound of the safety release vents opening, as well as but
the gauge. Wait 3 more minutes, then open the vent or remove the
weight and allow the steam to escape.
Step 13 - Remove the jars
Lift the jars out of the water and let them cool on a wooden cutting board or a towel, without touching or bumping them in a draft-free place (until warm to the touch). You can then remove the rings if you like. Now store them in a cool dark area, like a basement, or pop them into the fridge and you're done!
To use the cooked pumpkin
The pumpkin is now cooked and ready for the pie recipe. Just drain the water and puree the contents, then use as any cooked pumpkin!How about ...
-
How to make a pumpkin pie and How to make a flakey pie crust
-
How to make Pumpkin Bread
-
How to make pumpkin soup
-
How to make roasted pumpkin seeds
Alternative Cooking methods for step 4
If you don't have a microwave, or prefer another method, try these:Stovetop steaming - Place your steaming basket or grid in the bottom of a large pot. Put enough water so it won't boil dry in 20 minutes, and yet is not so high that the pumpkin is touching the water level. You may need to add more water during the cooking. Add the pumpkin prepared in step 3, and get the steamer going. The cooking time is only between 8 and 12 minutes, depending on the range (gas or electric), and the pumpkin literally falls off the skin.
Pressure cooker - Place your grid in the bottom of the pressure cooker. If your pressure cooker came with directions, follow those for pumpkin and/or winter squash, like butternut squash. If, like most people, you've long since lost the directions, try this: Add enough water to just touch the bottom of the grid or shelf that you will place the pumpkin on. Add the pumpkin prepared in step 3, put the lid with the gasket, the weight and anything else your cooker requires in place, and turn the heat on high. Once it starts hissing, turn it to medium or medium high. The cooking time should only be about 10 minutes, and the pumpkin should literally fall out of its skin.
Oven - You can also bake the prepared pumpkin in the oven, just like a butternut squash. This method takes the longest. Just put the prepared pumpkin in an ovenproof container (with a lid), add about 3 cups of water to help prevent it from drying out and pop it in an 350 F (175 C) oven. It normally takes about 45 minutes to an hour; just test it periodically by sticking it with a fork to see if it is soft!
|
Click here for this item on Amazon Click here for this item on Amazon |
Complete Water Bath Canner KitThis is the same type of standard canner that my grandmother
used to make everything from pumpkinauce to jams and jellies to tomato and
spaghetti sauce. |
|
Click here for this item on Amazon |
Food Strainer and Sauce MakerA food strainer allows you to easily make smooth tomato sauces, seedless jams and jellies, applesauce, soups, baby foods, and much more. The strainers can use different sized screens to filter out different sized seeds and debris. There are both hand cranked and motorized versions.Click here for more information, other strainers and supplies or to order! |
|
|
Lids, Rings, Jars, mixes, pectin, etc.Need lids, rings and replacement jars? Or pectin to make jam, spaghetti sauce or salsa mix or pickle mixes? Get them all here, and usually at lower prices than your local store! |


Can't find the equipment? We ship to all 50 states! Just email us!
Halloween Costumes
Here are some of the most popular Halloween costumes for children this year. For more choices, see our Halloween costumes pages.
- Inflatable Riding Dinosaur Costume for Adults - everyone LOVES this costume. It's a hit where ever you go!
- Harry Potter Costume Kids Plush Robe - With a hood, one for each house, Gryffindor, Hufflepuff, Slytherin, Ravenclaw, Hogwarts
- Wizard Robe Cloak Halloween costume for Kids
- Girl's Sparkle Princess Costume - In pink, for small girls
- Sew your own Halloween Costumes with Patterns from the Singer Sewing Reference Library
- Pizza Costume for Kids - A giant slice of pizza Halloween Costume for Children and Teens
- Easy Halloween Costumes for Children - Miniature patterns for 3 to 12 year old children, just enlarge and use
Find Related Information and Resources Here!
Here's the quick list to related farms for PYO, Honey, Pumpkins, Christmas trees, etc.:
You may find these websites useful!
- Local pick your own farms for apples, strawberries, raspberries, corn, tomatoes, etcr
- Farm markets and roadside stands
- Local Honey Finder
- Children's consignment sales
- Local Meat, Milk and Eggs
- Christmas Tree Farms and lots
- Road tripping and camping tips, tricks and How-to's
- Fun Factory Tours
- Venues for you event: Farms, Wineries, Orchards for your event, wedding or party
- Easter egg hunts
- Festivals: Fruit and vegetable festivals
- Winery tours and wine tastings
- Horses: rides, stables, lessons, trails
- Maple Syrup farms and sugarworks
- Bed and Breakfasts on Farms, Wineries, Ranches and Orchards
- Zombie Paintball venues
- Environmental resources
- Consumer fraud information
- Wholesale food sources
- Resources for Farmers
- Pumpkin patches
- Corn mazes
Water bath canning kit - 8 Piece Enamelware Pot with Canning kit and Rack. Canning Supplies Starter Kit
Double Donut Pumpkin Spice Coffee Pods, Single Serve Flavored Coffee for Keurig K Cups Machines,
Pumpkin Spice - Organic, 1.94-Ounce Jar, Nutmeg, Cloves, Ginger & Cinnamon, Enhances Tea, Seasoning, Kosher
Maud's Pumpkin Spice Instant Latte - 16 count Packets, Love Me Some Pumpkin Spice Latte
Pumpkin Pie Spice Blend Extract,McCormick Pure
Don't miss our page of costumes, ready made and ones you can make yourself!
And here's a book of 130 pumpkin carving stencils!
Pumpkin Carving stencils book - Over 130 Halloween jack olantern pumpkin designs. Including Witches, Cats, skulls, bats, ghosts, and so much more
More carving kits and stencils are here!
Find Other types of farms:
- Pick Your Own apples
- Christmas Tree Farms and lots
- Farm markets and roadside stands
- Local Honey
- Local Meat, Milk and Eggs
- Road trip and camping
Get the
most recent version of
the Ball Blue Book
Click here to get Halloween Costumes delivered - fast, great prices!
Click here to get Halloween Costumes delivered - fast, great prices!
Find Other types of farms:
- Pick Your Own apples
- Christmas Tree Farms and lots
- Farm markets and roadside stands
- Local Honey
- Local Meat, Milk and Eggs
- Road trip and camping
Get the
most recent version of
the Ball Blue Book